# Slides
## Add slide
If you have followed ***Start*** chapter, you already have slides added to your slider. If so, please scroll to [***Edit slide***](https://app.gitbook.com/@transition-slider/s/wordpress/editing/slides#edit-slide) section.
Otherwise, if your ***Slides tab*** is empty and looks like on image below, jump to [***Add new slide***](https://app.gitbook.com/@transition-slider/s/wordpress/new-slider#add-new-slide) section to read how to add slides.

After slides are added, ***Slides tab*** should look like this:

## Edit slide
Now that you have slides added to your slider, you can *edit* each slide individually. Hover with mouse over image and click EDIT to enter slide settings.

That will lead you to ***Slide settings page***. If you look at the "*breadcrumb navigation*" on the top, you'll see exactly where you at (for example: `Dashboard > Slider > Slide 1`).

### Device settings

{% hint style="info" %}
Switch between icons (**Desktop/Tablet/Mobile**) to target **Slide settings** for certain **device**.
Each device can have own **Slide settings** and **Layer Elements**.
If these settings stays unchanged, all devices will have the same settings as Desktop by defualt (first icon).
{% endhint %}
### Slide navigation and actions

{% hint style="info" %}
From here, you can switch to next or previous slide with ***NEXT*** and ***PREVIOUS*** buttons.
***SAVE*** button will save current slider changes.
***PREVIEW*** button will open slider modal window to see current changes (doesn't require saving).
***BACK*** button will lead you one step back to *Dashboard -> Slider settings.*
{% endhint %}
### Tooltip helper
{% hint style="info" %}
Mouse hover this icon to know more about certain option.
{% endhint %}
## Slide settings
In ***Slide settings*** window on the left side you can adjust some *main slide options*, like setting up slide animation, changing background and thumbnail.
### Background
Change slide image or video via wordpress media library.
### Thumbnail
Thumbnail image of slide will be generated automatically, after you select background image. If you don't like that, thumbnail image can be changed manually by clicking on area *Choose thumbnail image*.
### Transition
Select ***Transition effect*** for current slide from dropdown menu from one of the pre-built transitions by clicking on arrow on the right side, or leave *Default*.
{% hint style="info" %}
Hover with mouse over image to see transition preview.
{% endhint %}
***Effect Duration -*** duration of selected ***Transition effect*** between current and next slide
***Effect Brightness -*** brightness of selected ***Transition effect***, between current and next slide.
***Effect Distance -*** offset of selected ***Transition effect,*** between current and next slide.
***Effect Blur -*** motion blur of selected ***Transition effect**,* between current and next slide.
### Advanced
Slide can be *clickable* and you can also invert colors of website menu when slider is on certain slide.
To enable clicking on entire slide, in field ***Full Slide Link*** insert url where you want to redirect when user clicks on slide.
***Open link in new window***
If ***checked***, clicking on slide will open new tab. If this option is ***unchecked***, clicking on slide will redirect in the same tab.
***Invert menu colors***
If ***checked***, when the slider goes to this slide, website menu colors will be inverted. If this option is ***unchecked***, Transition slider won't effect website menu.
## Layer settings
In ***Layer settings*** window on the left side you can add ***Layer Elements*** like Text editor, Heading, Button, Image, Video or iFrame. To add ***Layer Element***, simply click on icon and it will be added to scene.
Each ***Layer Element*** can be adjusted individually and you can add as many elements as you want. We will be describing them one by one.
### Text Editor
Click on ***Text Editor*** icon to add text to scene. Once it's on scene, click on it to open it's options.

{% hint style="info" %}
switch between tabs below to open more details about settings.
{% endhint %}
{% tabs %}
{% tab title="Content" %}
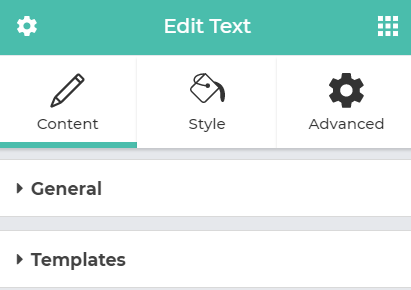
Under ***Content*** tab you'll find sections ***General*** and ***Templates***.
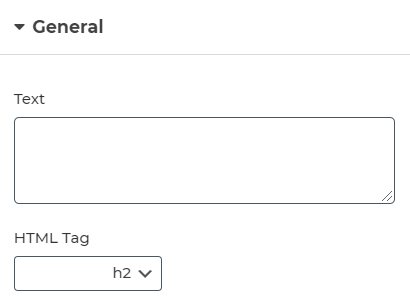
### General
In ***General*** section you can type your text content and use embedded text editor for text formatting.
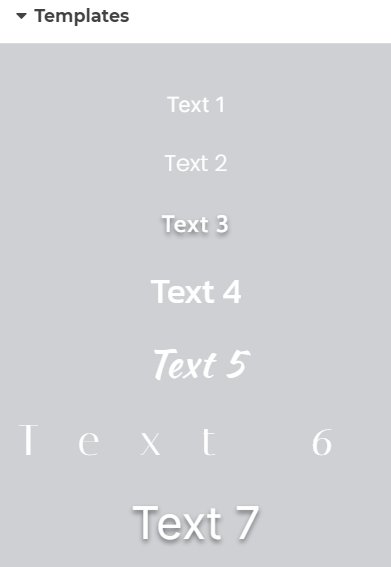
### Templates
In ***Templates*** section you can select 1of 16 *text templates* for your text. *Text templates* are pre-built texts with best fonts and sizes.
{% endtab %}
{% tab title="Style" %}
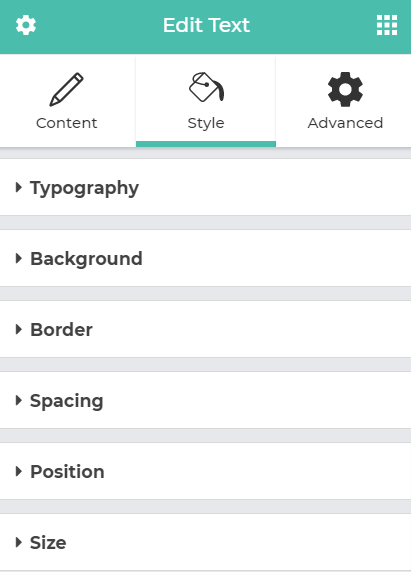
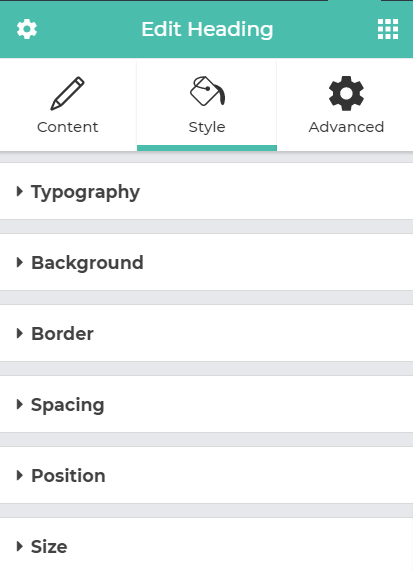
Under ***Style*** tab you'll find sections ***Typography, Background, Border, Spacing, Position, Size.***
### Typography
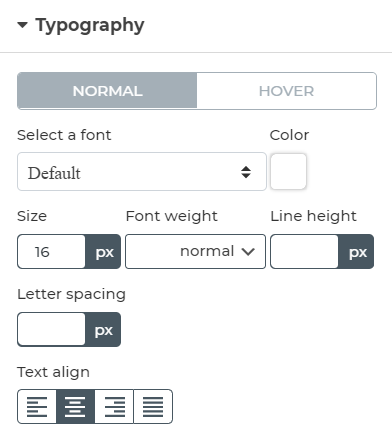
In ***Typography*** section you can fully customize your Text Element content. Change font size, weight, line height, etc.
One of the great features here is Google Font selection. Select one of the thousand beautiful **Google Fonts,** or you can use default system font.
### Background
In ***Background*** section you can add background color to your Text Element.
### Border
In ***Border*** section you can create border styles for your Text Element.
### Spacing
In ***Spacing*** section you can add margin and padding to your Text Element.
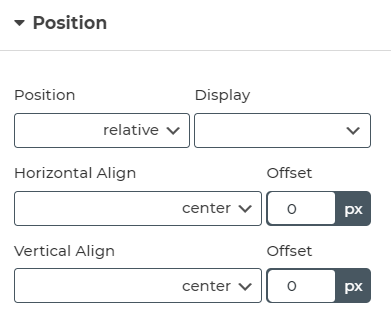
### Position
In ***Position*** section you can adjust Text Element position on scene. There are two main position options: *relative* and *absolute*.
***relative*** - this will position element as table row. This is the most used position in our [Templates](https://app.gitbook.com/@transition-slider/s/wordpress/slider-templates), and showed as best practice. With ***relative*** position you can achieve that all your Layer Elements are always visible on slide, and positioned properly, which is not always the case with ***absolute*** position.
***absolute*** - this will position element exactly to the scene coordinates x and y. Center of the scene is 0,0. With *offset* parameter you can change text position up/down, left/right by pixels.
***Display*** options ***block*** and ***inline-block*** gives you more flexibility in ordering your Layer Elements.
***Horizontal Align*** and ***Vertical Align*** are responsible for aligning Layer Element to left/center/right of the scene.
### Size
In ***Size*** section you can adjust text dimensions. 6 input fields are actual css properties: width, min-width, max-width, height, min-height, max-height. These settings are useful if you want your text to be in rectangle or square of exact size.
{% endtab %}
{% tab title="Advanced" %}
Under ***Advanced*** tab you'll find sections ***Animation, Parallax*** and ***Custom CSS***.
### Animation
***Animation type***
Text Element can be animated to scene when slide loads. To do that select ***Animation type - animation***. If you just want your text to appear instantly, select ***none***.
***Enter animation*** - animation when slide loads.
***Exit animation*** - animation when slider goes to next slide.
***Speed*** - duration of animation.
***Delay*** - animation starts with delay.
### Parallax
***Parallax*** option simulates 3D depth by moving the slider background slower than the webpage when scrolling. 0 is minimum value, and 1 is maximum value.
### Custom CSS
Add your own ***custom css*** properties to Text Element.
{% hint style="warning" %}
Custom CSS should be written by [css syntax](https://www.w3schools.com/css/css_syntax.ASP).
{% endhint %}
{% endtab %}
{% endtabs %}
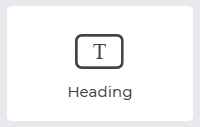
### Heading
Click on ***Heading*** icon to add heading to scene. Once it's on scene, click on it to open it's options.

{% hint style="info" %}
switch between tabs below to open more details about settings.
{% endhint %}
{% tabs %}
{% tab title="Content" %}
Under ***Content*** tab you'll find sections ***General*** and ***Templates***.
### General
In ***General*** section you can type your Heading content and use embedded text editor for text formatting.
### Templates
In ***Templates*** section you can select 1of 16 *text templates* for your Heading. *Text templates* are pre-built texts with best fonts and sizes.
{% endtab %}
{% tab title="Style" %}
Under ***Style*** tab you'll find sections ***Typography, Background, Border, Spacing, Position, Size.***
### **Typography**
In ***Typography*** section you can fully customize your Text Element content. Change font size, weight, line height, etc.
One of the great features here is Google Font selection. Select one of the thousand beautiful **Google Fonts,** or you can use default system font.
### Background
In ***Background*** section you can add background color to your Heading Element.
### Border
In ***Border*** section you can create border styles for your Heading Element.
### Spacing
In ***Spacing*** section you can add margin and padding to your Heading Element.
### Position
In ***Position*** section you can adjust Heading Element position on scene. There are two main position options: *relative* and *absolute*.
***relative*** - this will position element as table row. This is the most used position in our [Templates](https://app.gitbook.com/@transition-slider/s/wordpress/slider-templates), and showed as best practice. With ***relative*** position you can achieve that all your Layer Elements are always visible on slide, and positioned properly, which is not always the case with ***absolute*** position.
***absolute*** - this will position element exactly to the scene coordinates x and y. Center of the scene is 0,0. With *offset* parameter you can change text position up/down, left/right by pixels.
***Display*** options ***block*** and ***inline-block*** gives you more flexibility in ordering your Layer Elements.
***Horizontal Align*** and ***Vertical Align*** are responsible for aligning Layer Element to left/center/right of the scene.
### Size
In ***Size*** section you can adjust text dimensions. 6 input fields are actual css properties: width, min-width, max-width, height, min-height, max-height. These settings are useful if you want your text to be in rectangle or square of exact size.
{% endtab %}
{% tab title="Advanced" %}
Under ***Advanced*** tab you'll find sections ***Animation, Parallax*** and ***Custom CSS***.
### Animation
***Animation type***
Heading Element can be animated to scene when slide loads. To do that select ***Animation type - animation***. If you just want your Heading to appear instantly, select ***none***.
***Enter animation*** - animation when slide loads.
***Exit animation*** - animation when slider goes to next slide.
***Speed*** - duration of animation.
***Delay*** - animation starts with delay.
### Parallax
***Parallax*** option simulates 3D depth by moving the slider background slower than the webpage when scrolling. 0 is minimum value, and 1 is maximum value.
### Custom CSS
Add your own ***custom css*** properties to Heading Element.
{% hint style="warning" %}
Custom CSS should be written by [css syntax](https://www.w3schools.com/css/css_syntax.ASP).
{% endhint %}
{% endtab %}
{% endtabs %}
### Image
Click on ***Image*** icon to add image to scene. Wordpress media library will open where you can select image. *Choose* desired image and click *Select* to add image to scene.
Once it's on scene, click on it to open it's options.


{% hint style="info" %}
switch between tabs below to open more details about settings.
{% endhint %}
{% tabs %}
{% tab title="Content" %}
Under ***Content*** tab you'll find section ***General***.
### General
In ***General*** section you can change image source by clicking on ***Choose image*** area.
{% endtab %}
{% tab title="Style" %}
### Background
In ***Background*** section you can add background color to your Image Element.
### Border
In ***Border*** section you can create border styles for your Image Element.
### Spacing
In ***Spacing*** section you can add margin and padding to your Image Element.
### Position
In ***Position*** section you can adjust Image Element position on scene. There are two main position options: *relative* and *absolute*.
***relative*** - this will position element as table row. This is the most used position in our [Templates](https://app.gitbook.com/@transition-slider/s/wordpress/slider-templates), and showed as best practice. With ***relative*** position you can achieve that all your Layer Elements are always visible on slide, and positioned properly, which is not always the case with ***absolute*** position.
***absolute*** - this will position element exactly to the scene coordinates x and y. Center of the scene is 0,0. With *offset* parameter you can change text position up/down, left/right by pixels.
***Display*** options ***block*** and ***inline-block*** gives you more flexibility in ordering your Layer Elements.
***Horizontal Align*** and ***Vertical Align*** are responsible for aligning Layer Element to left/center/right of the scene.
### Size
In ***Size*** section you can adjust Image dimensions. 6 input fields are actual css properties: width, min-width, max-width, height, min-height, max-height. These settings are useful if you want your image to be in rectangle or square of exact size.
{% endtab %}
{% tab title="Advanced" %}
Under ***Advanced*** tab you'll find sections ***Animation, Parallax, Custom CSS*** and ***On click.***
### Animation
***Animation type***
Image Element can be animated to scene when slide loads. To do that select ***Animation type - animation***. If you just want your image to appear instantly, select ***none***.
***Enter animation*** - animation when slide loads.
***Exit animation*** - animation when slider goes to next slide.
***Speed*** - duration of animation.
***Delay*** - animation starts with delay.
### Parallax
***Parallax*** option simulates 3D depth by moving the slider background slower than the webpage when scrolling. 0 is minimum value, and 1 is maximum value.
### Custom CSS
Add your own ***custom css*** properties to Image Element.
{% hint style="warning" %}
Custom CSS should be written by [css syntax](https://www.w3schools.com/css/css_syntax.ASP).
{% endhint %}
### On click
Image Element can have custom actions *on click*. Select ***Action*** from dropdown menu:
#### none
Remove action from Image element
#### Open in Lightbox
Open Image Element in Lightbox mode.
#### Go to URL
Redirect to custom URL on Image Element click.
{% endtab %}
{% endtabs %}
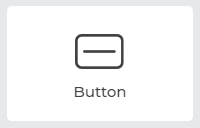
### Button
Click on ***Button*** icon to add button to scene. Once it's on scene, click on it to open it's options.

{% hint style="info" %}
switch between tabs below to open more details about settings.
{% endhint %}
{% tabs %}
{% tab title="Content" %}
Under ***Content*** tab you'll find sections ***General*** and ***Templates***.
### General
In ***General*** section, under ***Label*** option, you can type text content inside Button Element.
Button Element can have ***Link*** (custom url) to redirect to another page on button click, which can be done in same tab (**Open in new tab** - *unchecked*) or in new tab (***Open in new tab*** - *checked*).
### Templates
In ***Templates*** section you can select 1of 12 *Button templates* for your Button Element. *Button templates* are pre-built buttons with most common web button visual trends.
{% endtab %}
{% tab title="Style" %}
Under ***Style*** tab you'll find sections ***Typography, Background, Border, Spacing, Position, Size.***
### Typography
In ***Typography*** section you can fully customize your Button Element content. Change font size, weight, line height, etc.
One of the great features here is Google Font selection. Select one of the thousand beautiful **Google Fonts,** or you can use default system font.
### Background
In ***Background*** section you can add background color to your Button Element.
### Border
In ***Border*** section you can create border styles for your Button Element.
### Spacing
In ***Spacing*** section you can add margin and padding to your Button Element text.
### Position
In ***Position*** section you can adjust Button Element position on scene. There are two main position options: *relative* and *absolute*.
***relative*** - this will position element as table row. This is the most used position in our [Templates](https://app.gitbook.com/@transition-slider/s/wordpress/slider-templates), and showed as best practice. With ***relative*** position you can achieve that all your Layer Elements are always visible on slide, and positioned properly, which is not always the case with ***absolute*** position.
***absolute*** - this will position element exactly to the scene coordinates x and y. Center of the scene is 0,0. With *offset* parameter you can change text position up/down, left/right by pixels.
***Display*** options ***block*** and ***inline-block*** gives you more flexibility in ordering your Layer Elements.
***Horizontal Align*** and ***Vertical Align*** are responsible for aligning Layer Element to left/center/right of the scene.
### Size
In ***Size*** section you can adjust button dimensions. 6 input fields are actual css properties: width, min-width, max-width, height, min-height, max-height. These settings are useful if you want your button to be of exact size.
{% endtab %}
{% tab title="Advanced" %}
Under ***Advanced*** tab you'll find sections ***Animation, Parallax*** and ***Custom CSS***.
### Animation
***Animation type***
Button Element can be animated to scene when slide loads. To do that select ***Animation type - animation***. If you just want your button to appear instantly, select ***none***.
***Enter animation*** - animation when slide loads.
***Exit animation*** - animation when slider goes to next slide.
***Speed*** - duration of animation.
***Delay*** - animation starts with delay.
### Parallax
***Parallax*** option simulates 3D depth by moving the slider background slower than the webpage when scrolling. 0 is minimum value, and 1 is maximum value.
### Custom CSS
Add your own ***custom css*** properties to Button Element.
{% hint style="warning" %}
Custom CSS should be written by [css syntax](https://www.w3schools.com/css/css_syntax.ASP).
{% endhint %}
{% endtab %}
{% endtabs %}
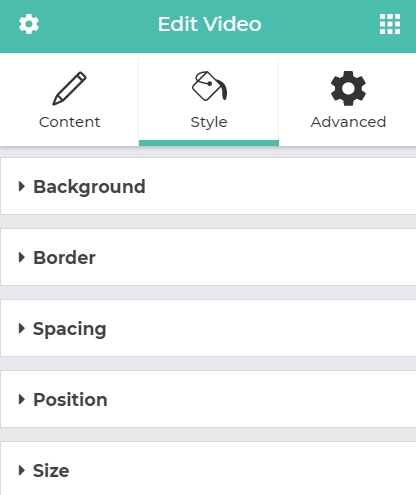
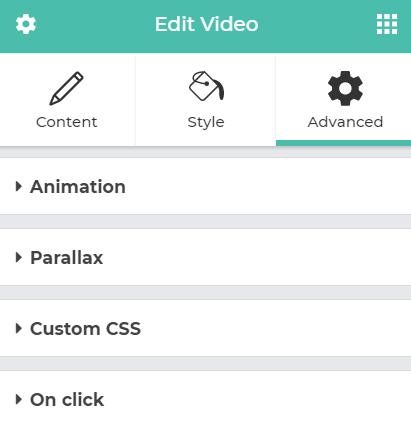
### Video
Click on ***Video*** icon to add video to scene. Wordpress media library will open where you can select video. *Choose* desired video and click *Select* to add video to scene.
Once it's on scene, click on it to open it's options.


{% hint style="info" %}
switch between tabs below to open more details about settings.
{% endhint %}
{% tabs %}
{% tab title="Content" %}
Under ***Content*** tab you'll find section ***General***.
### General
In ***General*** section you can change video source by clicking on ***Choose video*** area.
{% endtab %}
{% tab title="Style" %}
### Background
In ***Background*** section you can add background color to your Video Element.
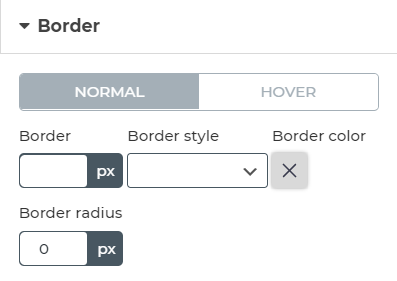
### Border
In ***Border*** section you can create border styles for your Video Element.
### Spacing
In ***Spacing*** section you can add margin and padding to your Video Element.
### Position
In ***Position*** section you can adjust Video Element position on scene. There are two main position options: *relative* and *absolute*.
***relative*** - this will position element as table row. This is the most used position in our [Templates](https://app.gitbook.com/@transition-slider/s/wordpress/slider-templates), and showed as best practice. With ***relative*** position you can achieve that all your Layer Elements are always visible on slide, and positioned properly, which is not always the case with ***absolute*** position.
***absolute*** - this will position element exactly to the scene coordinates x and y. Center of the scene is 0,0. With *offset* parameter you can change text position up/down, left/right by pixels.
***Display*** options ***block*** and ***inline-block*** gives you more flexibility in ordering your Layer Elements.
***Horizontal Align*** and ***Vertical Align*** are responsible for aligning Layer Element to left/center/right of the scene.
### Size
In ***Size*** section you can adjust Video dimensions. 6 input fields are actual css properties: width, min-width, max-width, height, min-height, max-height. These settings are useful if you want your image to be in rectangle or square of exact size.
{% endtab %}
{% tab title="Advanced" %}
Under ***Advanced*** tab you'll find sections ***Animation, Parallax, Custom CSS*** and ***On click.***
### Animation
***Animation type***
Video Element can be animated to scene when slide loads. To do that select ***Animation type - animation***. If you just want your vidoe to appear instantly, select ***none***.
***Enter animation*** - animation when slide loads.
***Exit animation*** - animation when slider goes to next slide.
***Speed*** - duration of animation.
***Delay*** - animation starts with delay.
### Parallax
***Parallax*** option simulates 3D depth by moving the slider background slower than the webpage when scrolling. 0 is minimum value, and 1 is maximum value.
### Custom CSS
Add your own ***custom css*** properties to Video Element.
{% hint style="warning" %}
Custom CSS should be written by [css syntax](https://www.w3schools.com/css/css_syntax.ASP).
{% endhint %}
### On click
Video Element can have custom actions *on click*. Select ***Action*** from dropdown menu:
#### none
Remove action from Video element
#### Open in Lightbox
Open Vdieo Element in Lightbox mode.
#### Go to URL
Redirect to custom URL on Video Element click.
{% endtab %}
{% endtabs %}
### iFrame
Click on ***iFrame*** icon to add iframe to scene. Once it's on scene, click on it to open it's options.

With iFrame Element you can embed any website page into your slide.
{% hint style="info" %}
switch between tabs below to open more details about settings.
{% endhint %}
{% tabs %}
{% tab title="Content" %}
Under ***Content*** tab you'll find section ***General***.
### General
In ***General*** section you can set iFrame source in ***URL*** field. iFrame source can be any website url, for example: .
{% endtab %}
{% tab title="Style" %}
### Background
In ***Background*** section you can add background color to your iFrame Element.
### Border
In ***Border*** section you can create border styles for your iFrame Element.
### Spacing
In ***Spacing*** section you can add margin and padding to your iFrame Element.
### Position
In ***Position*** section you can adjust iFrameElement position on scene. There are two main position options: *relative* and *absolute*.
***relative*** - this will position element as table row. This is the most used position in our [Templates](https://app.gitbook.com/@transition-slider/s/wordpress/slider-templates), and showed as best practice. With ***relative*** position you can achieve that all your Layer Elements are always visible on slide, and positioned properly, which is not always the case with ***absolute*** position.
***absolute*** - this will position element exactly to the scene coordinates x and y. Center of the scene is 0,0. With *offset* parameter you can change text position up/down, left/right by pixels.
***Display*** options ***block*** and ***inline-block*** gives you more flexibility in ordering your Layer Elements.
***Horizontal Align*** and ***Vertical Align*** are responsible for aligning Layer Element to left/center/right of the scene.
### Size
In ***Size*** section you can adjust iFrame dimensions. 6 input fields are actual css properties: width, min-width, max-width, height, min-height, max-height. These settings are useful if you want your iframe window to be of exact size.
{% endtab %}
{% tab title="Advanced" %}
Under ***Advanced*** tab you'll find sections ***Animation, Parallax*** and ***Custom CSS***.
### Animation
***Animation type***
iFrame Element can be animated to scene when slide loads. To do that select ***Animation type - animation***. If you just want your iFrame to appear instantly, select ***none***.
***Enter animation*** - animation when slide loads.
***Exit animation*** - animation when slider goes to next slide.
***Speed*** - duration of animation.
***Delay*** - animation starts with delay.
### Parallax
***Parallax*** option simulates 3D depth by moving the slider background slower than the webpage when scrolling. 0 is minimum value, and 1 is maximum value.
### Custom CSS
Add your own ***custom css*** properties to iFrame Element.
{% hint style="warning" %}
Custom CSS should be written by [css syntax](https://www.w3schools.com/css/css_syntax.ASP).
{% endhint %}
{% endtab %}
{% endtabs %}
###